A few folks asked me this. My main reason was that my Linksys BEFSR41V2 wired
router gave me the opportunity to forward WAN connection log records to Wallwatcher
using SNMP. This feature did not exist on the WRT54G using the standard Linksys
firmware, so I wanted to be able to use the BEF* as my primary router and hang the
WRT54G off it as a wireless access point.
Other reasons why you might want do to this include using the WRT* unit as a wireless
range extender, or to separate wireless clients from a wired router for security reasons.
You also get to use the WRT54G as a switch for the connection of additional wired
devices.
Network
The following diagram shows how I connected the equipment. Note that my WRT54G is
a Version 2 unit. At the time I was using SveaSoft firmware
DHCP server of the WRT54G is disabled, and its WAN connection is not used. The
BEF* router is the gateway for the LAN and manages the WAN connection. It also
includes static DNS settings from my ISP. You might not need to worry about this, but if
in doubt check with your ISP to find out what you need.
WRT54G configuration
There are other ways to “get there from here”, but this depends on how you are set up
initially. Needless to say, I can’t be responsible for any problems that you might
encounter.
1) Reset the WRT54G to factory defaults
The first thing you will probably need to do will be to “hard reset” the WRT54G to factory
default settings. This WILL destroy any custom router settings, so be sure to make
written notes of these so you will be able to recreate them later. This is NOT covered in
this document. Refer to your router’s manual and your ISP as may be required.
To reset the router, use a paper clip or something similar to hold down the recessed
switch marked “Reset” for at least twenty seconds. If in doubt, refer to your router
manual.
2) Connect a computer to the WRT54G
Next, connect a computer to one of the four numbered ports on the back of the router
using a regular Ethernet patch cable. It should be set up to use DHCP to acquire a
dynamic address.
3) Sign in to configure the WRT54G
Now use your web browser to sign in to the configuration web site on the router using
the default gateway address http://192.168.1.1, and the default password “admin”.
Refer to your router manual if you are not sure.
4) Setup/Basic Setup
Setup/Basic Setup options should now be configured as follows:
1. Disable the router’s DHCP server (clients will use the server on the BEF* router
at 192.168.2.254, which is also the gateway).
2. Set a static IP address for the WRT54G itself (I used 192.168.2.253).
3. Set the gateway address.

When you have made your changes, hit the “Save Settings” button at the foot of the
page. The WRT54G will then reboot and you will lose your connection.
5) Rewire the LAN
Now you have to connect the equipment as shown in the “Network” diagram above.
6) Setup/Advanced Routing
The following steps might not be required, but this is what I did to get it working for me.
Configure Setup/Advanced Routing as below.
1. Configure the default route:
2. Route for the LAN:
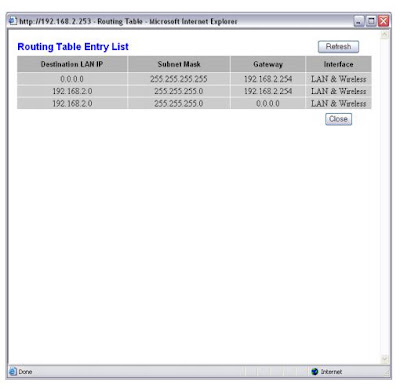
3. The Routing Table now looks like this:
Notes
I wrote up the first version of this document so I’d be able to remember how recreate
the configuration. Since then, the information has proved to be quite popular, so I
updated it and provided additional explanations. If you have any comments or questions
you can e-mail me here: info@michaelcook.ca.
You can check out other HOWTO’s here and various Hints and Tips here.
My other web site is at www.michaelcook.ca.
Right now I am using Sveasoft’s free Alchemy-V1.0 v3.37.6.8svV1.0 v3.37.6.8sv
firmware. See http://www.linksysinfo.org/ for more information on this and other 3
rd party firmware for the WRT54G.
source: http://www.skyprod.net/pub/HowTo/WRT54GWAP/How%20to%20set%20up%20WRT54G.AP.V2.pdf


