Use the instructions below to install the Canon CR-25/55 scanner drivers for use
with Web Client version 4.0. You must have administrative rights on the
workstation and be assigned the Web Client supervisor role to install and register
the scanner.
Installing the Canon CR-25/55 Scanner Drivers
To install the Cannon CR-25/55 scanner drivers for use with Web Client 4.0, do
the following:
Task 1: Download the Canon CR-25/55 Scanner Driver
Note: The upgrade process and individual windows can vary depending on your
workstation setup, operating system, and individual user rights. The steps below
are to be used as a general guide to complete the install.
1. To begin, download the driver from the “Download Driver” section on
the landing page.
2. From the home page, select “Download Driver”
3. Once the list of drivers appears select the Canon CR-25/55 from the
menu.
4. In the File Download window, click Save.
5. In the Save As window, click Save to save the file to your Desktop.
6. Wait for the driver to download.
8. Click Next to start the wizard.
9. Click Next
Note: If you want to change the destination of the files, click Browse to select a new location.
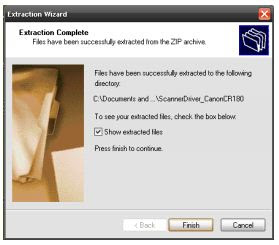
10. Select Show extracted files and click Finish to complete the extraction and show the extracted files.
1. Double-click the setup.exe file to open the Canon CR-180 installation wizard.
2. Wait for the Preparing install screen to finish.
3. Click Next to begin the install process.
4. If you receive a Security Warning, Click Run to continue with the install.
5. Use the Default English language, Click OK.
6. Once the scanner driver install completes Click Finish.
7. Once the Driver Install is completed the Scanner Utility Software install will begin.
8. Click Next to continue with the Utility Install
9. Agree to the license agreement, Click Yes
10. Click Next to agree with the default file location.
11. Click Finish to complete the install.
12. Plug in the scanner and connect it to the computer. You can then log in to Web Client to register the computer and scanner.


